How to build a termite farm
The project described here uses eastern subtropical termites. Their scientific name is Reticulitermes flavipes. I only have experience with these termites because these are the kind we can trap in our area and these are the kind sold for teaching purposes. If you live outside the eastern US, you may have other kinds of termites and you may have to adjust the size of your farm or the manner in which you catch them. You can find information online or check with your local agricultural extension service.
Buying eastern subterranean termites
If you cannot trap your own termites, you can buy them. I know that you can purchase them from Carolina Biological Supply Company, but there may be other sources. I believe they sell Reticulitermes virginicus, a close relative of the eastern subterranean termite that we have here in Connecticut. At the Carolina Biological Supply website you can also download a termite care sheet that gives useful information about keeping termites. They also have a video that gives some tips on termite care. You should buy only the worker termites, not the soldiers. The soldiers do not eat wood so they will not survive very long in your farm and they will not eat the balsa wood or kraft paper.
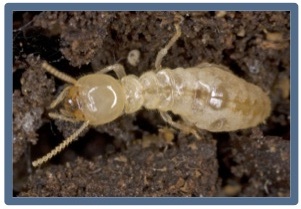
A worker Reticulitermes flavipes
Trapping eastern subterranean termites in the woods
You can trap your own termites if you live near a woods. Termites live underground during the winter and emerge when nighttime temperatures stay well above freezing, typically in late March or April. You find them by turning over old logs and looking for them on the underside of the log or on the ground under the log. The logs are usually not very rotten, though the bark may have already fallen off. Termites have to move from wood to soil because their nest is underground. They move through underground tunnels to the nest. They need to always be in moist environments and they avoid light. So when you turn the log over, they rapidly scatter underground or into the log. You are looking for white creaturesabout 1/8 inch long without a “waist.” You will often find ants under logs and you can distinguish them from termites since they are either black or red with longer legs and narrower middles. Be careful when you turn over logs as, depending upon the time of year, bees, hornets and yellow jackets can have nests under logs. Watch the log for a bit to see if anything is flying around it. Also, depending upon your location, snakes can hide under logs. It is best to roll over larger logs with a long pole.
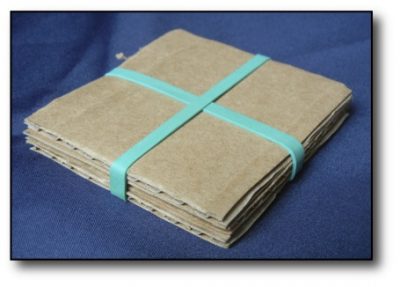
When you find a good log, place your trap under the log and roll the log back on top of it. A trap is easily made with a few pieces of corrugated cardboard stacked and held together with rubber bands. Cardboard is like candy to termites and after a week or so, if you have found an active termite-infested log, they will have crawled inside to begin eating it. Thoroughly wet the cardboard before placing it under the log. You can put several moist traps in a bag to carry with you. Check your trap starting about 2-3 weeks after you set it an every week afterward. It is best to set several traps since finding an active log is tricky. If you find one log with termites, you may find others nearby. Termite nests are underground and they tunnel from there to nearby logs.
When you find a trap with termites, place the trap in a plastic box in which you have placed a layer of dampened sand. You do not want too much moisture, no puddles of water. Use a tight-fitting lid if you have a small number of termites. If you place hundreds of termits in a sealed box, they can suffocate in a few days. You could put holes in the lid and stuff them with fine steel wool or polyester quilt batting to allow air in and to keep the termites in. You can keep them in the box with the cardboard for many weeks. Store it in a dark place at room temperature. Don’t let it get too hot or too cold. Spray some water in periodically to keep the cardboard damp, but not wet. Also check for mold growth. If you find this, you need to make a new home with fresh sand and cardboard. Only move the termites and not the old cardboard or sand to the new home to minimize transferring the mold to the new box.
Here are some pictures of one of our termite hunts.
Building the farm
Materials
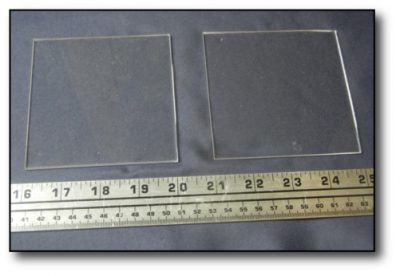
- 1/8 inch acrylic sheet, medium strength (Plexiglass® for example)
- Eye protection
- Work gloves
- Metal ruler or yardstick
- Table with a cutting surface
- Polyester quilt batting or fine steel wool
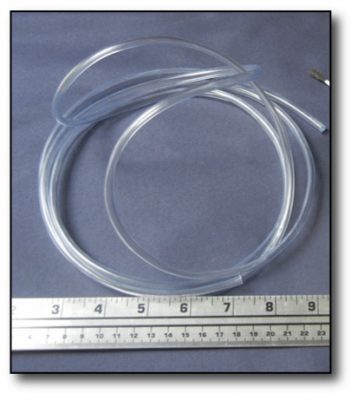
- Tubing, PVC or polypropylene (Tygon® for example)
- Scissors
- 1/32 inch Balsa wood or Kraft paper (the brown paper used for grocery bags)
- Binder clips
- Clean sand like that used in sandboxes
- Glass dish with lid or aluminum foil
- Oven
- Eye dropper
- Zipper storage bags
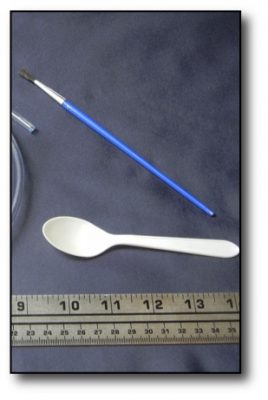
- spoon
1. Plexiglass
I have made farms in three sizes, 3 X 3, 4 X 4, and 6 X 6 inches. All of them work, but the larger sizes do not dry out so fast.
Cutting plexiglass can be dangerous, so if you have not worked with plexiglass before or you are a child, please ask the store where you buy it to cut it for you.
If you choose to cut it yourself, you’ll need a box cutter and a ruler or yardstick. A metal rule is best so you do not cut it with the box cutter. Measure the width you want to cut off, align the rule and score the line repeatedly with the cutter. You are not trying to cut through the plexiglass, so you don’t have to push down too hard. You just want to make a groove in it. Be very careful since the plexiglass is slippery and the cutter can slip across it and seriously cut you. Keep your hands behind the cutter as you use it to prevent cutting yourself if the blade slips. Work on a surface that you don’t mind cutting since the blade might hit the surface when it comes to the end of the plexiglass.
When you have made a groove, align the groove on the edge of a table with the part that you want to break off hanging over the edge. You are going to push down on the overhanging plexiglass while firmly pressing down on the part on the table to keep it in place. The part overhanging the table is going to snap off, hopefully along the line you scored. You might want to wear gloves since it will snap off suddenly and your hand or wrist might scrape across the raw edge of the plexiglass. Shards might also come off, so eye protection should be worn.
2. Tubing
Cut a piece of tubing long enough to go around three sides of the farm. The piece will be slightly shorter than the added length of three sides (3 + 3 + 3 = 9 in or 6 + 6 + 6 = 18 in). You can lay the tubing along three sides one of your plexiglass sides and then cut it to the proper length.
3. Assembly
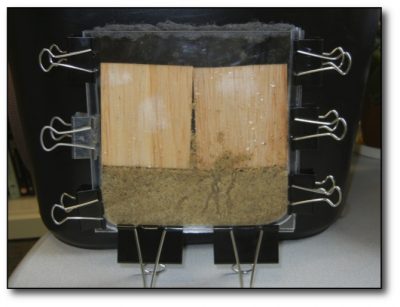
This part takes some patience. Lay one of the plexiglass slides on a table near the edge. Start by laying the tubing along one side of one of the plexiglass sides. Imagine that the tubing will flatten a bit when you assemble the farm, so place it a bit in from the edge so it does not bulge out too much when it gets squeezed. Hold it in place and put the other plexiglass side on top of it and now hold the tubing trapped between those two sides with one hand. Now wind the tubing along the next edge of the sides by pushing it between the two sides. Don’t let it kink, but also don’t let it form a U-shape. You want it to be nearly square, but with rounded corners. Continue to feed the tubing in along the third side, again forming a rounded, but not kinked, corner.

Now push one side of the entire assembly (not the bottom) off the edge of the table so you can get a binder clamp on it to squeeze the sides onto the tubing. Keep holding the sides together or it will all spring apart when the clamp squeezes it. Now put a clamp on the side opposite the side you just clamped. Finally clamp the remaining side, the bottom of your farm. It is best to use two clamps on the bottom because these provide four “legs” to hold the farm upright. You’ll have to adjust the bottom clamps a bit so that the farm stands level.
4. Sand
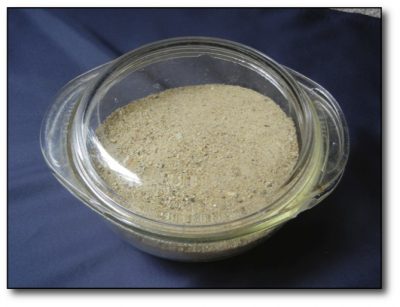
You need to heat the sand in an oven to kill molds that will otherwise sprout in the farm and harm the termites. Put about two cups of sand in a glass or metal container with a loose-fitting lid. Do not seal the lid tightly. Spread the sand out as much as possible. Place in an oven preheated to 350°F for one hour. Take it out and let it cool to room temperature before using. You could also spread the sand on a baking sheet or piece of foil and put a glass jar in the oven with it. After baking, when the sand has cooled, you can pour it into the jar and close the lid for storage. Obviously foil has more potential for making a mess in the oven if it gets bumped or tears.
Now use a spoon to put sand in the farm. Add about ¾ in of sand to a 3 X 3 farm or 1½ in to a 6 X 6 farm. Tamp it down by gently tapping the farm on the table. Don’t worry that some fine particles of sand will stick to the plexiglass walls. You can rinse most of that down with the water you will add.
Add several drops of water to moisten the sand. You do not want to see water puddles so if you add too much, pour any drops out or use some tissues to wick it out.
5. Balsa wood or Kraft paper
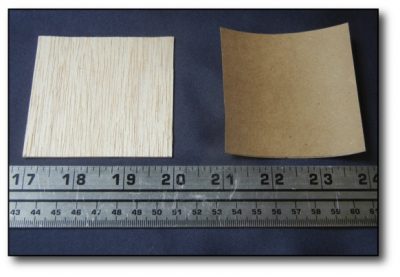
Soak the squares of balsa wood or Kraft paper in water until they are moistened. Blot off excess water and place them in the farm on top of the sand. They need to be in contact with the surface of the sand so that the termites can easily go from the sand to their food. There needs to be space between the wood or paper and the inner wall so the termires ca crwl over at least one face of the material. Very thin, 1/32 inch, balsa wood is necessary. Other woods, eaqually thin, may work, too.
6. Termites
Now it’s time to put the termites into the farm. You ca put a lot of termites in your farm. I have put 20 in a 3 X 3 farm and over 50 in a 4 X 4 farm. Use a paint brush to pick them up out of the continer you bought them in or the plastic container you put them in after trapping your own. You ca let them crawl onto to brush to pick the up. Alternatively, if they are on a piece of wood or tissue, you can brush them off into the farm. If you drop them on the table, they run to find cover and escape the light. Do nt use a tweezers or forceps because you will crush or injure them. They are too delicate for those instruments.
7. Batting or steel wool
Tuck some polyester battling like that used for quilt making into the top of the farm. This lets air in but keeps the termites from getting out. I’ve used fine steel wool, too, but it may rust with the moister of the farm. Do not use cotton or tissue as these may mold and the termites might try to eat them. I have never seen a termite try to crawl out and have never seen any winged males or queens form, so it is unlikely escape is a problem. This material is more for your peace of mind.
8. Storage
Termites hate light and love dampness, so always provide those. Put the farm, standing upright, in a zipper bag with the top folded over, not zipped. Place a moist tissue in the bag to keep the atmosphere inside humid. Keep the farm in a cupboard or other dark area. You could cover it completely with a heavy cloth to keep out the light. Keep it in a place that does not get too warm. Carolina Biological Supply suggests temperatures of 10 to 15.5°C (50 to 60°F). I’ve kept them at around 70°F without a problem. Check them at least once a week (more frequently for small farms, like the 3 X 3 size) to make sure the sand and wood or paper are damp. Again, not too damp. No puddles. Use an eye dropper or a straw to add a few drops to moisten the farm. Be careful so you do not drown the termites. It is easier to add the drops with the batting removed. If you put the drops on top to let them go through, sometimes it takes such a large drop to do this that too much water goes in in a single, large drop.
9. Mold and pests
Mold can grow in the farm since it is so moist. That is why you need to bake your sand to kill off most molds. If you start to see molds growing, it is best to make a new farm and transfer the termites, but not the wood or paper, to a new farm. I have also seen very small mites or insects appear. At first I thought they were termites nymphs (babies), but they never got larger. They did not seem to do any harm.
10. Enjoy!!!